Tuesday, 6 May 2014

Monday, 5 May 2014
MAC – VIVA GLAM
I
MAC – VIVA GLAM
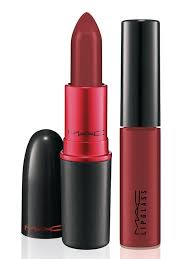
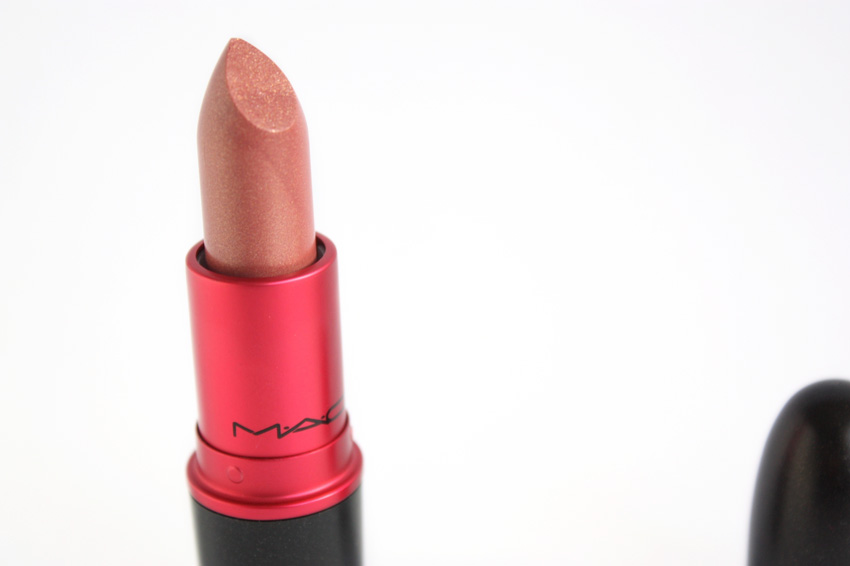
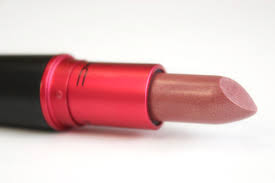
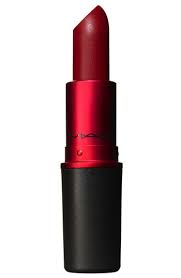
In 1994 M·A·C introduced VIVA GLAM which was an outspoken deep red that was universal in appeal and glamour. In 1997 a 2nd lipstick named VIVA GLAM II was created it was a pinked mauve shade. VIVA GLAM III, a foxy brown plum launched in 2000. VIVA GLAM IV a heartful rose charged with gold was introduced in March 2002. In March 2004 Viva Glam V made its debut it was a pure neutral pink with a delicious Lustre finish! VIVA GLAM VI, the newest member of the VIVA GLAM family, is a warm terracotta-plum with pearl finish. Wear it alone or finish it off with a coat of VIVA GLAM VI Lipglass. Every cent of the selling price of VIVA GLAM Lipstick and Lipglass is donated to the M·A·C AIDS Fund to support men, women, and children living with HIV and AIDS. That’s something you probably didn’t know (it’s definitely something I didn’t) and it has raised a lot of money over the years for the AIDS fund.


MAC – VIVA GLAM
In 1994 M·A·C introduced VIVA GLAM which was an outspoken deep red that was universal in appeal and glamour. In 1997 a 2nd lipstick named VIVA GLAM II was created it was a pinked mauve shade. VIVA GLAM III, a foxy brown plum launched in 2000. VIVA GLAM IV a heartful rose charged with gold was introduced in March 2002. In March 2004 Viva Glam V made its debut it was a pure neutral pink with a delicious Lustre finish! VIVA GLAM VI, the newest member of the VIVA GLAM family, is a warm terracotta-plum with pearl finish. Wear it alone or finish it off with a coat of VIVA GLAM VI Lipglass. Every cent of the selling price of VIVA GLAM Lipstick and Lipglass is donated to the M·A·C AIDS Fund to support men, women, and children living with HIV and AIDS. That’s something you probably didn’t know (it’s definitely something I didn’t) and it has raised a lot of money over the years for the AIDS fund.
Viva Glam I
Viva Glam II
Viva Glam III
Viva Glam IV
Viva Glam V
Viva Glam VI
Enjoy!
Eilish J
Wednesday, 9 April 2014
3 Easy Overnight Hair Curling techniques
1.The Sock Bun
https://www.youtube.com/watch?v=nBx-ucYUim82.The Headband Technique
https://www.youtube.com/watch?v=BLeSKaPaUOA3.Paper Bag Curls
https://www.youtube.com/watch?v=WoZ2QGq0n4AWednesday, 2 April 2014
Spring/Summer '14 hair colour trends.
The ultimate hair trend of 2014 has got to be Ombré hair. With a dark colour on top and slowly it gets lighter. Most popular is the brown to blonde ombré, and it looks amazing! Also another spring/summer 2014 hair colour is the whole idea of honey blonde and golden blonde highlights. We're loving the trend in Beauty Land!! Let us know your thoughts on the colour trends.


Ombré nails
Who needs to go to the salon to get their nails anymore? Especially when you can do such a beautiful design on nails from the comfort of your own home. A steady hand needed for some but Ombré nails are the new buzz and if you ain't got 'em you will be getting them soon. And we've found you step by step tutorials to help you get the latest fashion. Have fun! And be sure to comment if you're looking for any trends you'd like us to cover! Enjoy ladies :)


.jpg)


Tuesday, 1 April 2014
Three ways to do a plait :)
Three ways to do a plait !
Below
are three ways to a plait , there are cute easy and look really good. So take a
look and learn how to do three new plaits J !
The
first plait is a waterfall plait. This is a really nice plait it looks really
good when done. It’s really easy and won’t take you long at all J
Brush
the hair and makes sure its all straight. Grab a chunk of hair from the front ,
and bring it to the back of your head and divide into three pieces. Bring the
bottom piece over the middle piece, and then the top piece over the middle
piece. Grab another piece of your hair from the top and add it to the piece of
your plait. Bring the top piece over the middle piece. Grasp the bottom piece
with pinky. Drop the piece you have on your pinky , and get another piece from
the bottom. Bring the new piece over the middle piece. Continue doing this
until you get halfway around your head and pin with a clip. Do the other side and
now your doneJ
.jpg)
The
next plait is a fishtail plait . Divide your hair into a side parting and
take the whole length of your hair over to one side. Begin by splitting the hair
into two sections. Take a small piece of hair from the outside of one of the
two main sections and bring it to the inside of the opposite section. Then take a small piece of hair from the
outside of the other section and bring it to the inside of the opposite section
and pull tight. Keep taking small pieces from each side into the inside of each
section to develop the introverted braided pattern. Keep going till the end and
then you’re finished J

The
final plait is a traditional plait. Divide your hair into three equal sections.
Take the whole right section of your hair and cross it over the middle section.
The right section of hair has now become the middle section vice versa. Cross
the whole left section of hair over the middle section. Continue alternating
with the left and right sections in this criss-cross pattern. Hold hair tight
to keep it neat. Wrap a bobbin on the end and then you’re finished.
.jpg)
Subscribe to:
Comments (Atom)